 Associated
project file
Associated
project fileRefraction
TOC
What is refraction? A document to answer that question.
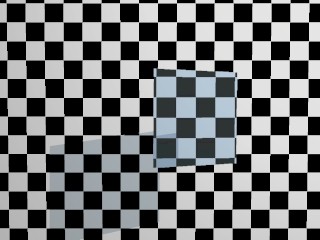
How does AM99 handle refraction? Quite well. I have done a number of tests to see what AM does to calculate refraction. What I have discovered makes physical sense. AM calculates refraction as soon as a ray from the camera encounters a transparent surface. Consider the following test image. In this image there is a background plane of checks. Some distance in front of the plane is a smaller plane with an index of refraction of 1.33 (water) and a bluish color. You can see that the checkered pattern is disrupted by the refraction of the plane. You might consider that there is a "block" of water all the way to the next surface in the direction of the light rays. In other words, all of the refraction occured at the first surface a ray encounters and until the ray encounters another surface, those rays can be considered to be in a medium of that index of refraction. Please note that AM rays always start in a medium of index of refraction of 1.
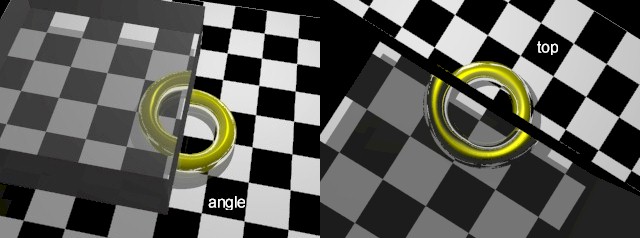
The next test is simply one that we may all have observed when going to the pool. When you look in the pool, the depth of the water is much less than in reality. This is called apparent depth. A similar example of this is placing a block of glass on top of another object. Because of the higher index of refraction of the glass, the portion of the object under the glass appears closer to the surface. As in the figure below, the half of the torus under the "glass" appears raised when compared to the half in air. This is more evident in the figure labeled top. The half under glass (lower half) appears much nearer and larger than the upper half of the image. This is simply because of the way the light bends as it is leaving (in the real world - really entering it in ray tracing) the glass block.
This appears to have worked fine. A block of glass was placed over the torus (wrong highlight colors on the torus though should be goldish on reflection as well). The two projects for this part are: glass_block.prj and glass_block_b.prj
What happens when an object is under water. In water the apparent depth is reduced from the real depth, making the object appear bent closer to the surface. The way I did this was again with a plane with the index of refraction set to 1.33.
 Project file: Water_plane_1 (just a quick note it is kind of
neat to look at the project and do a progressive render since you can see the
shifting of the image with respect to the model.
Project file: Water_plane_1 (just a quick note it is kind of
neat to look at the project and do a progressive render since you can see the
shifting of the image with respect to the model.
Clearly this worked fine. The next step was to test two surfaces. Again my test is using only planes. In this case two planes.
 Project file: Water_plane_2
Again, this exactly what one would expect to see if the object passed through a sheet of water! The object returns to its original angle after leaving the water. So far so good. Now what would happen if we were under water and were looking up at an object that went from the water into the air? What would be expect to see? We would expect to see that the object bends towards the surface's normal. It would look longer and bend upwards (assuming the water surface were horizontal and its normal vertical). This is the reverse of looking from air into water. Because of AM99's asumption that all rays leaving the camera are in air, then we must trick AM into thinking that the rays pass through water twice. My technique was to simply set up a small plane set right in front of the camera with the refractive index set to what I desired. All rays passing through this surface now have the set index of refraction. When they encounter another transparent they revert to an index of refraction of 1 regardless of that surfaces index of refraction setting. (? is it transparent or any surface. I am uncertain on this)
 Project file: Water_air_refract
Again, this works fine. However, one has to be careful of the angles or you get large blank, black regions. These regions occur where you would see Total Internal Reflection occuring. In other words, the light cannot escape the high index medium for those angles. Recall that this occurs for large ray angles. Unfortunately, AM99 is unable to calculate total internal reflection and produces the black regions where Snell's law fails. My next tests were of various types of simple lenses. In each lens the first image has the object have an index of refraction of 1. Then in the second test it has an index of refraction of 1.6 - appropriate for glass. The first test was of a spherical lens, which is a positive focal length lens. If the object you are looking at is further than the focal point of the lens, then you should see the object inverted and smaller than the object. The second test was of a diverging lens - this is the type of lens that someone who is near sighted would wear. It is thinner in the center of the lens than at the edges. When looking through this type of lens you will always see the object smaller than without the lens and always oriented in the same way as the object.
n=1, spherical lens 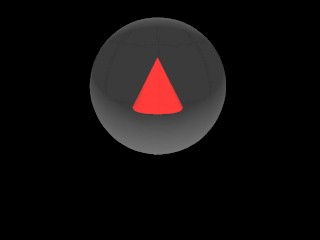 n=1.6, spherical lens
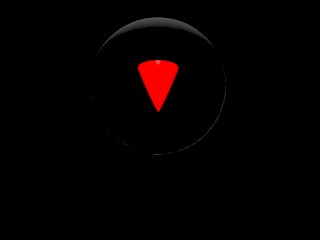
Project file: Sphere_lens
n=1, diverging lens 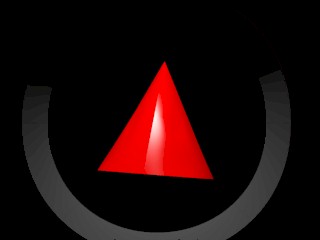 n=1.6 diverging lens
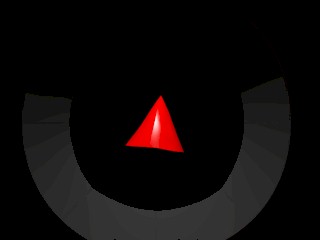
Project file: Diverging_lens
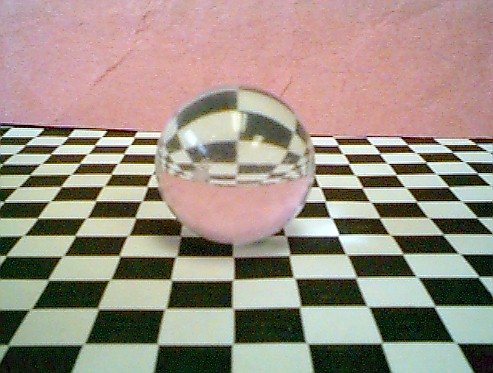
Just to compare with the real world, consider a sphere sitting on a checkered table with a background. What would we see? First a couple of photos: one with a high quality sphere and one with a poor quality sphere. Notice the flaws in the poor quality sphere.

So how does AM99 do with a sphere in a similar situation? Pretty good!
 Project file: glass_sphere
What would happen if you had air bubbles in water or glass? What would it look like? How would you model this? Well, a spherical air bubble in water would actually act just like a diverging lens - that is, as you looked through the bubble the object would always be upright but would be smaller than the object really was. To simulate this in AM what you need to do is to make a sphere with the same index of refraction as the substance you are nominally in. You have to also convince all of the rays from the camera they are in that substance. So, as in the example of looking from water into air, you can put a small transparent plane in front of the camera to set the index of refraction and then if you want a bubble you create a transparent sphere with the index of refraction of water on its surface. As a ray passes through the plane - it set the index of refraction to 1.33 (for water). When it encounters the sphere the first time, the index of refraction reverts to 1. When a ray goes through the sphere a second time it is again set to 1.33! Thus you have an air bubble. The images on the left are made as described above. On the top right you simply have the effect of a water sphere where the air bubble was before and in the lower right you simply have not air bubble.
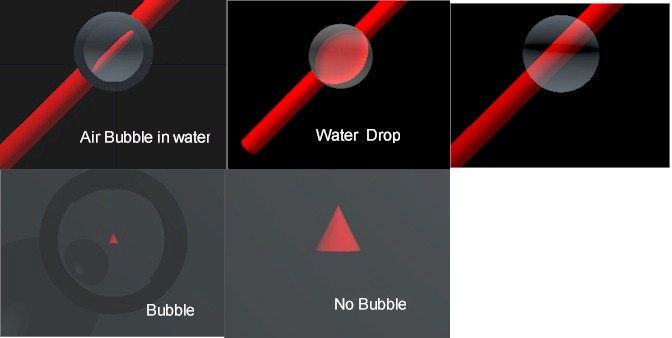
Project file for top image: Bubble_in_water
Project file for bottom image: Bubble_in_glass_block
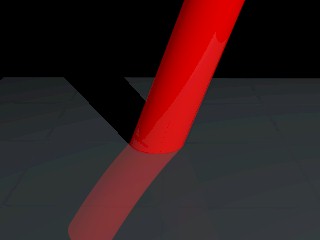
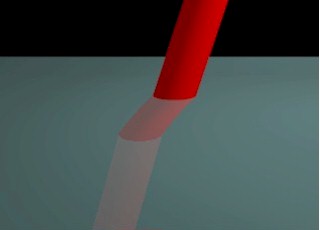
Total internal reflection occurs when a light ray tries to go from a high index of refraction material to a low index of refraction material at an angle exceeding the critical angle. In this case, the reflection is like that of a perfect mirror. A right angle prism used to redirect light works by this prinicple as do fiber optics and retroreflectors. A photo of showing real-life total internal reflection situation. Notice that you CANNOT see the background through the prism. You do see a surface reflection. The white background in the prism comes from a business card to the left of the bottle cap.How does AM handle total internal reflection? It does not. Take a look at the right hand image. Everywhere the prism face is dark is where total internal reflection should have occured.

Real Total Internal Reflection AM99 Project file: TIR
I made a little movie (my first one!) showing what happens with a prism as the index of refraction is increased from 1.0 (really nothing there) to 2. You can see that the background slews past as the index of refraction increases. At some point total internal reflection starts to occur and you can see the black part move across the prism.
Refraction Movie Project file: TIR_mov